1. Welcome to Tundras.com!

    You are currently viewing as a guest! To get full-access, you need to register for a FREE account.

    As a registered member, you’ll be able to:
    • Participate in all Tundra discussion topics
    • Transfer over your build thread from a different forum to this one
    • Communicate privately with other Tundra owners from around the world
    • Post your own photos in our Members Gallery
    • Access all special features of the site

Red Tundra Camper Build

Discussion in '2.5 Gen Builds (2014-2021)' started by mrmahi, Apr 4, 2024.

  1. Apr 4, 2024 at 6:49 PM
    #1
    mrmahi

    mrmahi [OP] New Member

    Joined:
    Oct 27, 2022
    Member:
    #85551
    Messages:
    47
    Gender:
    Male
    Vehicle:
    2014 Tundra
    20240326_151329.jpg
    Please bear with me as this may be a bit long....
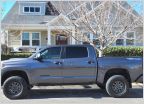
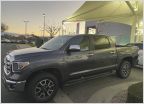
    So I have owned this Tundra since new in 2014. The first build was mainly for hunting and surfing trips here in Hawaii; Thule racks for boards, open bed to haul the ATV, deer, pigs and hunting gear. Worked well until I got the itch to start camping again....

    20140817_105527esize.jpg

    DSCN2124resize.jpg

    DSCN1970esize.jpg
    Some background: After moving to mainland in the 80's, I used to camp all the time, way prior to the "overlanding" phase ongoing now. We had VW campers and would camp the beach constantly, chasing windswell, hurricane swells and offshore winds up and down the Texas coast. We would rebuild our vans, make them reliable, and over the years, perfect the art of beach camping year round.
    Living in south central Texas, our "internet" back then was the Weather Channel and telephone. To find the best surf, we would make a long distance phone call for a surf report of the entire Texas coast and learn the weather patterns using the Weather Channel. (The Weather Channel was on almost 24/7 at my place!) We would head to the beach with the best surf conditions (mostly slop) regardless of a 3.5 or 9 hour drive. But we were stoked and the surf would get good occasionally.
    We also made numerous trips into Central America. As surfers, I believe the adventuring is a major part of the lifestyle.

    First Surf Van:
    20240403_165402esize.jpg
    20240404_093008resize.jpg
    'Gorda, May, '88

    20240403_165345resize.jpg
    Corpus, mid 80's

    Second Surf Van:
    20240403_165124esize.jpg

    After moving back to Hawaii in 1990, I continued to camp all over the island until it reached a point where the crowds were out of hand or access was denied in places (mid 2000's). Those early days prior were awesome.

    20240403_165513esize1.jpg

    20240403_165644resize.jpg

    Third Surf Van:
    20240403_165615esize.jpg

    20240403_165502esize.jpg

    Pre-awning days
    20240403_165629esize.jpg
    20240404_101045copyre.jpg
    Ukumehame mid 90's
    Eventually, a demanding job and other interests (boat, hunting, health issues, etc) took center stage, so few camping trips were taken for quite a few years....relative to going roughly 50 to 80 nights a year.

    Fast forward to today: The purpose of the build was/is to encapsulate an all in one vehicle: camping, hunting, fishing and surfing. I loved the ease and fuctionality of the VW campers and wanted to try and emulate that functionality in the 4WD Tundra. It has been a fun and challenging project, borrowing from others and my own ideas, and many components in the build were recycled from various items I had laying around. The base of the camper started with a shell off of an older Dodge pickup I bought for $400.
    Did I hit that target? I guess all I can say is that It has evolved into what it is, as you may see in the following posts...

    20240324_084243re.jpg
     
    Last edited: Apr 15, 2024
  2. Apr 4, 2024 at 7:35 PM
    #2
    mrmahi

    mrmahi [OP] New Member

    Joined:
    Oct 27, 2022
    Member:
    #85551
    Messages:
    47
    Gender:
    Male
    Vehicle:
    2014 Tundra
    First thoughts were to create a tent around the Thule racks and have a portable power system. The criteria was to be able to haul the surfboards, kayaks and ATV, be relatively easy to set up, and of course haul the other gear necessary for camping.
    20220430_181852re.jpg
    The idea was to have the fridge in the front on a slider in the rear passenger area for permanent mounting. I ran the wires and ran it for a while that way, sans slider.
    Initial Solar Panel install:
    20220719_182155re.jpg

    Wiring diagram
    Wiringinitialre.jpg

    Inital power box build
    20221006_190331re.jpg
    .
     
    Wallygator and NoMoreGreen like this.
  3. Apr 5, 2024 at 10:53 AM
    #3
    mrmahi

    mrmahi [OP] New Member

    Joined:
    Oct 27, 2022
    Member:
    #85551
    Messages:
    47
    Gender:
    Male
    Vehicle:
    2014 Tundra
    As I was contemplating the build, some work needed to be done. I had originally installed Pro Comp ZX2078 front lift shocks and a .5 coachbuilder shim. Unfortunately, after months of squeaking, I found the culprit...the shock had worn into the top plate. This was at about 60K miles.
    DSCN2002re.jpg

    20240405_065528.jpg

    I decided to go with a set of toytech 3" coilovers on the front
    20220522_161908re.jpg
    While I was at it, I went with a Warn semi hidden winch bumper with a 12000 lb winch, a lightbar, fogs, and a TRD grill, and a cat shield/skid for a bit more protection.
    20220807_141604re.jpg

    20220807_182123re.jpg

    IMG_20240219_102935re.jpg

    and fabbed a mount to add a Smittybuilt Air compressor with front and back bibs
    20220821_161900re.jpg

    20240405_065641.jpg
     
    Last edited: Apr 5, 2024
    Wallygator likes this.
  4. Apr 5, 2024 at 12:55 PM
    #4
    mrmahi

    mrmahi [OP] New Member

    Joined:
    Oct 27, 2022
    Member:
    #85551
    Messages:
    47
    Gender:
    Male
    Vehicle:
    2014 Tundra
    Initial Shell Purchase:
    Next up, I had decided on adding a shell instead of the tent idea. Looking around for about a year, there were no shells around used or new for a Tundra. My only option was to order an ARE through a shop on Oahu and have it shipped from the mainland. The shell I speced out would have cost $4500-5000 delivered.
    So I took some measurements and started looking into what shell may fit. I figured for the cost of a new shell I could mod the shell for a better fit myself (used to build surfboards, so am versed in fiberglass construction). I found a shell with the correct dimensions on CL for $400 and decided to give it a go. I was off a mid 90's Dodge I believe.

    resize1.jpg

    00e0e_l031tO9Exmvz_0CI0t2_600x450.jpg

    resize2.jpg

    Got it home:

    20230106_192122re.jpg


    20230106_192131re.jpg

    20230107_101231re.jpg

    20230107_101520.jpg


    Last edited: Apr 15, 2024
    NoMoreGreen likes this.
  5. Apr 6, 2024 at 11:07 AM
    #5
    mrmahi

    mrmahi [OP] New Member

    Joined:
    Oct 27, 2022
    Member:
    #85551
    Messages:
    47
    Gender:
    Male
    Vehicle:
    2014 Tundra
    Paint:
    After removing it from the truck, I put it in the paint stand and began inspecting. It had a few leaks, clear coat was peeling, and was dirty, but overall it was in good shape structurally.

    20230114_172126re.jpg

    20230109_174335re.jpg

    20230116_112015re.jpg

    131003re.jpg

    First primer coat:
    131412re.jpg

    The clear coat was a PIA..I essentially had to take it down to the original primer, glaze and sand again. Then the epoxy primer nightmare. After going to the paint store and being shocked by the prices (used to paint cars and had been at least 15 years since I had been in that store) I didnt think twice about usingthe primer and catlyst I had sitting around from a job long time ago.
    Had them shake the primer at the store, and did not think about the catylst going bad. The primer went on ok, not great, but I was going to block it anyway. A few hours passed, tacky. A day passed, still tacky. I soon realized what happened and was thinking I would have to strip the entire thing down possibly chemically and start over. I decided to just let it sit and see if it would harden. Slowly it was getting better and better, and after a week it looked like I was out of the woods. Whew! I let it sit another week and was able to sand it. Got lucky. I reprimed it with some high build primer and continued.

    vlcsnap-2024-04-06-07h46m35s076.jpg

    Second primer coat
    138649re.jpg

    20230415_112219re.jpg

    First Coat:
    vlcsnap-2024-04-06-07h45m19s422.jpg

    Color sand and compound:
    139223re.jpg

    139220re.jpg
     

    Attached Files:

    Last edited: Apr 15, 2024
    Terndrerrr and Wallygator like this.
  6. Apr 6, 2024 at 1:48 PM
    #6
    mrmahi

    mrmahi [OP] New Member

    Joined:
    Oct 27, 2022
    Member:
    #85551
    Messages:
    47
    Gender:
    Male
    Vehicle:
    2014 Tundra
    Rack Build:
    So this may have been the most challenging part of the build. I was considering a rack from one of the offroad outfits, but in the spirit of keeping this build as inexpensive as possible, I decided to build my own. Shipping costs alone from the mainland add an entire dimension to costs here. As well, I could customize as I went along. It is built with all aluminum.
    Initial layout:
    20230128_120720.jpg

    Solar panel mockup
    20230219_144334.jpg

    Mount mockup:
    20230304_104909.jpg

    20230304_104925.jpg

    Side rail mockup and fab:
    20230221_171116.jpg

    20230304_104917.jpg

    20230415_182106.jpg

    vlcsnap-2024-04-06-08h52m49s846.jpg

    vlcsnap-2024-04-06-08h52m00s382.jpg

    Solar and accessories mockup:
    20230305_105449.jpg

    20230305_140653.jpg

    20230305_140642.jpg

    Paint and reassembly:
    The paint is actually high quality trim paint. Holding up really well so far.
    vlcsnap-2024-04-06-08h54m24s181.jpg

    vlcsnap-2024-04-06-08h54m46s530.jpg

    20230501_115035.jpg

    139783.jpg

    139955.jpg

    139958.jpg

    20230628_153953.jpg

    140426.jpg

    141472.jpg

    20230517_172045.jpg


    20230512_173950.jpg


    Pau with Rack. I have since taken off the Thule SUP carrier and added rack pads.
    20230503_172821.jpg

    It turned out super strong and light. Lots of room for further customization. I later added the propane tank mount and awning bracket.


    154214.jpg

    IMG_20240219_144628a.jpg
     

    Attached Files:

    Last edited: Apr 15, 2024
    Terndrerrr and Wallygator like this.
  7. Apr 13, 2024 at 11:32 AM
    #7
    mrmahi

    mrmahi [OP] New Member

    Joined:
    Oct 27, 2022
    Member:
    #85551
    Messages:
    47
    Gender:
    Male
    Vehicle:
    2014 Tundra
    Windows:
    Prior to the rack install, I rebuilt the windows with new seals, tint, paint and new screens, and added carpet to the inside:

    20230109_091442e.jpg

    141177.jpg
    20230418_154708.jpg


    141187.jpg

    139312.jpg

    141271.jpg
     
    Last edited: Apr 15, 2024
  8. Apr 13, 2024 at 1:25 PM
    #8
    Wallygator

    Wallygator Well Zippedy Da Do!

    Joined:
    Apr 7, 2020
    Member:
    #44761
    Messages:
    2,560
    I'm in for more! Very nice!:thumbsup:
     
    dittothat likes this.
  9. Apr 13, 2024 at 3:02 PM
    #9
    mrmahi

    mrmahi [OP] New Member

    Joined:
    Oct 27, 2022
    Member:
    #85551
    Messages:
    47
    Gender:
    Male
    Vehicle:
    2014 Tundra
    Awesome! Mahalos! I'll keep posting the build.
     
    PomDad and Wallygator[QUOTED] like this.
  10. Apr 13, 2024 at 8:23 PM
    #10
    mrmahi

    mrmahi [OP] New Member

    Joined:
    Oct 27, 2022
    Member:
    #85551
    Messages:
    47
    Gender:
    Male
    Vehicle:
    2014 Tundra
    Next up, decided to remove the bedliner, and install a diff breather beforehand136730re.jpg
    Removed the liner and was filthy underneath.
    20230507_154613.jpg
    Cleaned up perty gud after 10 years. No rust either!
    140617re.jpg
    I then added a bedrug.
    140692.jpg
     
    Terndrerrr and Wallygator like this.
  11. Apr 14, 2024 at 12:41 PM
    #11
    mrmahi

    mrmahi [OP] New Member

    Joined:
    Oct 27, 2022
    Member:
    #85551
    Messages:
    47
    Gender:
    Male
    Vehicle:
    2014 Tundra
    Shell Install:
    Next order of business was to get the shell on the truck by myself. I considered hanging the shell off of the rafters above and swinging it somehow, but figured I would keep it simple and try and slide it over the wall on a blanket. I installed the front window and had a go. Guestimate of the weight at this point was around 275 pounds with the rack and no side or rear windows.140956.jpg
    Then I slid it over on a 2x4 across the bed.
    a.jpg
    Windows installed.
    20230522_075333.jpg
    Rear Window installed.
    141735.jpg
    The only real "mod" I had to do on the shell was to cut a 1" strip off of the bottom of the rear window frame. I used a bulb type seal along the bottom and a double bulb seal on the tailgate.
     
    Last edited: Apr 15, 2024
  12. Apr 14, 2024 at 1:54 PM
    #12
    mrmahi

    mrmahi [OP] New Member

    Joined:
    Oct 27, 2022
    Member:
    #85551
    Messages:
    47
    Gender:
    Male
    Vehicle:
    2014 Tundra
    Interior Build:
    Time to start the interior build. I wanted to go as light as possible and integrate a DIY topper lift. The lift is currently installed and works, however, I am modifying it and will include that portion of the build in a future thread.
    I selected 1/4" birch for the paneling and used 2020 extruded aluminum for the frames.

    Mocking up the actuators
    20230525_093708.jpg

    20230529_152833.jpg

    Frame mockup
    20230529_174729.jpg

    20230529_134201.jpg

    Panel mockup. I used doors and a drawer out of an old Vanagon stove cabinet that I had in my boat. It was termite ridden (not the parts I used), and other parts were used in other portions of the build as you will see. As stated earlier, I used as many recycled parts as possible.
    20230531_082938.jpg

    Drivers side
    20230531_120655.jpg

    Passenger side
    20230606_175503.jpg

    20230603_181318.jpg

    I also added some Molle panels to the sides.
    20230621_192841.jpg

    152737.jpg

    As you can see the aluminum chips (along with grass, sticks and everything else) are/were in the carpeting on the shelf tops, so I decided to do something a bit different.

    Faux marble cabinet top creation using epoxy.
    20231027_094938.jpg

    20231103_104009.jpg

    153638.jpg

    153637.jpg
     

    Attached Files:

    Last edited: Apr 15, 2024
  13. Apr 15, 2024 at 3:17 PM
    #13
    mrmahi

    mrmahi [OP] New Member

    Joined:
    Oct 27, 2022
    Member:
    #85551
    Messages:
    47
    Gender:
    Male
    Vehicle:
    2014 Tundra
    Electrical/Wiring:

    Wiringa.jpg 152584.jpg

    List of accessories:

    Battery: Interstate AGM H8 95 amp hours. Also have a removable Duracell Powerblock 500 (478 watt hours)

    Solar: Total of 470 watts. Two panels for a total of 210 watts on the rack., one panel permanently fixed, the other can be removed as a remote panel or tilted as needed. Pull pins hold that panel into the rack system.
    Two roaming panels that are plugged into SAE outlets on the outside of the shell 100 watts and 160 watts.
    I have two MPPT controllers (one being a component of a DC to DC charger). The roof wires are wired into the cabin with 10AWG wires into a 60 A DC circuit breaker cutoff switch, then to the controller.

    140489a.jpg

    154941.jpg

    20231112_104336.jpg

    20240414_173754.jpg

    20230613_141854.jpg

    20230916_124023.jpg

    20231022_090922.jpg
    Shore Power:
    110v ac comes into the shell via an inlet then to a 30 am circuit breaker disconnect to two plugs for a total of four outlets. When the extension cord is plugged in to the inlet, an onboard ac charger (NOCO Genius 5A smart charger, the cheap one in the pic above stopped working) is automatically activated. I can also plug in the Powerblock to charge if needed, as well as the rechargeable mini vacuum.

    20240414_173818.jpg

    Refrigeration: Mossimo CX50 from Costco. Been working well for about 3 years so far, cant complain for the price. Also have an Alpicool C15 for backup. Have a remote operated thermometer in the CX50.
    System runs everything so far, although I have not had it in total no-sun conditions. I did have about two days of cloudy to partly cloudy days on the last trip. No problems.

    20231022_173449.jpg

    Lighting: On the interior, have two rows of LED lights, and a separate system with a remote control to change colors (for bugs) and dimming. The "Tool Kitchen" has the same on a separate system(as you will see in the next post) I can control all of the components from my phone or tablet: Monitor the MPPT solar controller, operate both sets of LED lights, and monitor fridge temps. On the exterior, there are two sets of flood lights one set in the rear and one set on the side.
    Other: Thee are three 12v DC sockets, one SAE socket, and a total of 6 USB ports. There is also a 24 inch smart TV with an antenna port on the outside of the shell.

    151784.jpg

    152607.jpg
     
    Last edited: Apr 15, 2024
    Terndrerrr, dittothat and Wallygator like this.
  14. Apr 15, 2024 at 9:49 PM
    #14
    mrmahi

    mrmahi [OP] New Member

    Joined:
    Oct 27, 2022
    Member:
    #85551
    Messages:
    47
    Gender:
    Male
    Vehicle:
    2014 Tundra
    The "Tool Kitchen":
    This was probably the most fun of all the projects on this build. I took the idea of a "Pull Kitchen" which was initially posted on the Tacoma forum and decided to build my own. https://pullkitchen.com/ The shipping to Hawaii make it cost prohibitive, thus my use of recycled parts. I think the price for those kitchens was on the order of 4 to 5K, then add in shipping...you get the picture.
    It has wheels so I can remove the entire unit, independent fuse panel powering the lights, water pump and usb ports, 4.5 gallon water tank, sink and stove, built in cutting boards and tables, spice racks, etc.
    It started with an $80 tool box off of Craigslist.
    00c0c_iXS6WfIJvt4z_0CI0t2_1200x900.jpg

    I already had purchased some slides with the idea of a Fridge slide in the rear of the cab. I knew I had a stove and sink out of a Vanagon in my boat that was falling apart and not being used. Started with some measurements and it seemed like it might work:

    20220829_160026.jpg

    20220829_160441.jpg

    20221122_173440.jpg

    I had an old ice machine, and pirated parts from that, as well as a few parts from an old propane grill:
    20221119_140710.jpg
    20221203_095849.jpg

    Trial fit prior to removing bedliner:
    20221204_103748.jpg

    20221203_171048.jpg

    Building the slide frame:

    20231105_105417.jpg

    Fabbing the Fridge slide:

    20240316_170011.jpg

    Lighting:
    20231104_175945.jpg

    153699.jpg

    153968.jpg

    At Camp!
    20240324_085310.jpg

    20240323_205613.jpg

    20240324_084243.jpg
     

    Attached Files:

    Last edited: Apr 16, 2024
    Wallygator, TOYOTARIG and Gaston like this.
  15. Apr 15, 2024 at 10:25 PM
    #15
    blenton

    blenton New Member

    Joined:
    Jul 15, 2022
    Member:
    #80740
    Messages:
    1,567
    Nice build! I might have to hit you up on some tips for refurbing that topper. Mine is looking a tad shabby. And has a few scratches. And leaks. And the clear coat is peeling. And is the wrong color.. Ha.

    I dig the setup, though.
     
  16. Apr 16, 2024 at 9:18 AM
    #16
    mrmahi

    mrmahi [OP] New Member

    Joined:
    Oct 27, 2022
    Member:
    #85551
    Messages:
    47
    Gender:
    Male
    Vehicle:
    2014 Tundra
    Absolutely, LMK. Used to paint cars a long time ago. Some things have changed, but still no getting out of prepping the surface work. And paint prices...wow!
     
  17. Apr 19, 2024 at 9:34 PM
    #17
    mrmahi

    mrmahi [OP] New Member

    Joined:
    Oct 27, 2022
    Member:
    #85551
    Messages:
    47
    Gender:
    Male
    Vehicle:
    2014 Tundra
    DIY Topper Lift:
    20230919_154300.jpg

    I have been integrating the topper lift in almost every aspect of the build....and will be the last part of the initial project to implement. It is already implemented, in fact it works, but I wanted to do a few things before actually using it. First is reinforcement. I felt that with any more weight on the roof the dynamic load would be too much for the actuators. The actuators are rated for 200lbs each, so the static load is reasonable.
    Here are some photos of the process:
    Bracket Mockup:
    20230529_154722.jpg

    20230909_111651.jpg

    20230909_124721 - Copy.jpg

    20230618_125911.jpg

    Seal install:
    20230923_114306.jpg

    Second is the buildout of a custom tent. I have begun sewing a few things for practice, fishing rod covers, curtains, and various other items for the build. I have the design in mind, but what it will actually look like in the end is anyone's guess.

    Test.png

    Which brings us to this stage of the build. I am aiming to have the top lift reinforcement and tent build finished by mid May. I am considering the reinforcement of the awning as part of the process as well. Ill be working on the top lift reinforcement and some other refinements to various components, so stay tuned and we will see how far I get!
     
    Wallygator and dittothat like this.
  18. Apr 20, 2024 at 5:00 AM
    #18
    Terndrerrr

    Terndrerrr somewhere remote guzzling dealer repellent

    Joined:
    Jul 8, 2019
    Member:
    #32965
    Messages:
    5,062
    Gender:
    Male
    Music City
    Vehicle:
    Dual 5.7s
    TRD Fox, RAS, 285/75 DTs, dual battery, SS3 Pro
    Lots of cool stuff here. Really love what you did with the old topper. And your bed power/wiring setup is :thumbsup:
     
  19. Apr 20, 2024 at 2:43 PM
    #19
    mrmahi

    mrmahi [OP] New Member

    Joined:
    Oct 27, 2022
    Member:
    #85551
    Messages:
    47
    Gender:
    Male
    Vehicle:
    2014 Tundra
    Thanks Terndrerr! Fun project.
     
    Terndrerrr[QUOTED] likes this.

Products Discussed in

To Top