Manufacturer | SYLVANIA |
---|---|
Brand | SYLVANIA |
Model | 38772 |
Item Weight | 4.8 ounces |
Product Dimensions | 8 x 2 x 6 inches |
Country of Origin | USA |
Item model number | HRK.BX |
Is Discontinued By Manufacturer | No |
Exterior | Machined |
Manufacturer Part Number | HRK.BX |
OEM Part Number | 38771 |
Voltage | 12 Volts |
Enjoy fast, free delivery, exclusive deals, and award-winning movies & TV shows with Prime
Try Prime
and start saving today with fast, free delivery
Amazon Prime includes:
Fast, FREE Delivery is available to Prime members. To join, select "Try Amazon Prime and start saving today with Fast, FREE Delivery" below the Add to Cart button.
Amazon Prime members enjoy:- Cardmembers earn 5% Back at Amazon.com with a Prime Credit Card.
- Unlimited Free Two-Day Delivery
- Streaming of thousands of movies and TV shows with limited ads on Prime Video.
- A Kindle book to borrow for free each month - with no due dates
- Listen to over 2 million songs and hundreds of playlists
- Unlimited photo storage with anywhere access
Important: Your credit card will NOT be charged when you start your free trial or if you cancel during the trial period. If you're happy with Amazon Prime, do nothing. At the end of the free trial, your membership will automatically upgrade to a monthly membership.
Add other items:
- 6 VIDEOS
Image Unavailable
Color:
-
-
-
- To view this video download Flash Player
SYLVANIA - Headlight Restoration Kit - 3 Easy Steps to Restore Sun Damaged Headlights With Exclusive UV Block Clear Coat, Light Output and Beam Pattern Restored, Long Lasting Protection
Learn more
Purchase options and add-ons
- Restores Headlight To A Like-New Appearance and Removes Haze: Headlight lenses on your vehicle can become yellow, dull, and hazy from the sun. Our Headlight Restoration Kit fully removes haze and corrosion and restores the clarity and shine you need to see downroad at night.
- Restores Headlight Light Output: Restores original clarity and vision to sun damaged plastic headlight lenses. The lenses will be clearer, the headlight will shine brighter, and the road ahead will be better illuminated.
- 3 Easy Steps To Restore Long Lasting Uv Protection To Your Headlights: Step 1 - Surface Activator, Proprietary activator softens plastic, making it easier to sand smooth. Step 2 - Sand and Polish. Step 3 - Finish and seal with UV Block Clear Coat applicator.
- Lifetime Warranty: The components of this kit are good for two headlight assemblies. Once installed properly, the performance of the Sylvania Headlight Restoration Kit is guaranteed by a Lifetime Warranty for as long as you own your car.
- The Sylvania Standard Of Quality: With over 100 years in business, Sylvania is the world leader in automotive lighting for Original Equipment Manufacturers (OEMs) and the aftermarket.
Frequently bought together
Similar items that may deliver to you quickly
From the brand
-
SYLVANIA Headquarters
Expertly Engineered in Hillsboro, NH
-
Why buy SYLVANIA products?
Headquartered in historic Hillsboro, NH, SYLVANIA is an OEM automotive lighting manufacturer with over 100 years of optical engineering experience. Each product has to pass rigorous safety and quality standards before it goes out the door.
Do SYLVANIA bulbs follow U.S. government safety regulations?
SYLVANIA headlight bulbs are designed with safety in mind to prevent dangerous glare, when installed properly.
-
-
-
Accessories
Headlight restoration kits & more
-
-
In-Car Electronics
Peace of mind on the road
-
-
Tire Inflators
Prevent a flat tire by keeping tires properly inflated
-
With over 100 years of optical engineering experience and lighting innovation, countless drivers and leading car manufacturers use SYLVANIA.
Product Description
The SYLVANIA Headlight Restoration Kit will restore your lenses to a like-new appearance at a fraction of the cost of replacing all new lenses on your vehicle.
Restore original clarity and vision to sun-damaged plastic headlight lenses in three easy steps. Remove haze and lessen road glare allowing you to improve your down-road vision.
The SYLVANIA Headlight Restoration Kit also includes a proprietary UVB Clear Coat application designed to preserve your lens clarity for long-lasting results.
|
|
|
---|---|---|
Wash the headlight lenses and then spray Surface Activator -- a proprietary surface corrosion softener only from Sylvania, generously onto each headlight lens until they are completely covered. Let this liquid sit on each lens for about 50 seconds. Immediately, you’ll see the yellow gunk start to break down. Wash completely with water to remove loosened corrosion. |
Use the wet sanding technique described in your instruction sheet, using the 400, 1000 and 2000 grits and paper included in the box. This will remove corrosion. Apply the clarifying compound using even circular motions. Rinse and dry. Reapply the Surface Activator for 30 seconds and rinse with water. You’ll be amazed at how clear the lenses will already be. |
Ensure all moisture is removed from on and around the headlight lens. You’ll then apply the UV Block Clear Coat. It’s simple. Just apply as instructed in smooth, even applications. This UV Block Clear coat is a specially formulated polymer coating with active and passive UV blockers. This is the component that gives you long-lasting results. |
BEFORE AND AFTER RESULTS
The left side of the headlight lens is hazy and sun-damaged, inhibiting your headlight from functioning properly. The right side of the headlight lens has been treated with the SYLVANIA Headlight Restoration Kit. The headlight lens is restored close to its original condition, allowing your headlight system to function at top performance.
*Actual results will depend on the severity of UV degradation. Greater existing UV damage will allow for greater performance improvements.
Product information
Technical Details
Additional Information
ASIN | B00429NKWK |
---|---|
Customer Reviews |
4.6 out of 5 stars |
Best Sellers Rank | #186 in Automotive (See Top 100 in Automotive) #3 in Automotive Headlight Restoration Kits |
Date First Available | September 8, 2010 |
Warranty & Support
Feedback
What's in the box
Product guides and documents
Compare with similar items
This Item SYLVANIA - Headlight Restoration Kit - 3 Easy Steps to Restore Sun Damaged Headlights With Exclusive UV Block Clear Coat, Light Output and Beam Pattern Restored, Long Lasting Protection | Recommendations | dummy | dummy | dummy | dummy | |
Try again! Added to Cart | Try again! Added to Cart | Try again! Added to Cart | Try again! Added to Cart | Try again! Added to Cart | Try again! Added to Cart | |
Price | -13% $21.75$21.75 List: $24.99 | -25% $33.95$33.95 List: $44.99 | -9% $29.99$29.99 List: $32.99 | $15.99$15.99 | $19.99$19.99 | $19.99$19.99 |
Delivery | Get it as soon as Thursday, May 30 | Get it as soon as Tuesday, May 28 | Get it as soon as Tuesday, May 28 | Get it as soon as Wednesday, May 29 | Get it as soon as Wednesday, May 29 | Get it as soon as Tuesday, May 28 |
Customer Ratings | ||||||
Instruction quality | 4.6 | 4.3 | 4.7 | 2.3 | — | 4.4 |
Easy to use | 4.4 | 4.3 | 4.5 | 4.2 | — | 4.1 |
Longevity | 4.3 | 4.0 | 4.0 | 3.6 | — | 3.3 |
Sheerness | 4.6 | 4.2 | — | — | — | 3.7 |
Value for money | — | 4.3 | — | 4.2 | — | 3.7 |
Sold By | Pattern. | Amazon.com | gliptone | Qarroxi | R/A Hoerr Incorporated | Amazon.com |
Looking for specific info?
Customer reviews
Customer Reviews, including Product Star Ratings help customers to learn more about the product and decide whether it is the right product for them.
To calculate the overall star rating and percentage breakdown by star, we don’t use a simple average. Instead, our system considers things like how recent a review is and if the reviewer bought the item on Amazon. It also analyzed reviews to verify trustworthiness.
Learn more how customers reviews work on AmazonCustomers say
Customers like the cleaning power of the product. They say it dissolves the layer of haze to expose more of the clarity. They also appreciate the easy-to-follow step-by-step instructions. Customers say the product is worth the money and well worth the time. They are satisfied with quality, appearance, and clarity. However, some customers report that the headlights still remain hazy. Customers also differ on brightness.
AI-generated from the text of customer reviews
Customers are satisfied with the quality of the auto accessory. They mention that it works well, produces great results, and is game-changing. Some say that the instructions are adequate. Overall, most are happy with their purchase and recommend it to others.
"...This neat little kit has almost everything you need to get started on your headlights...." Read more
"...Not only is it incredibly easy to use, but the results are simply phenomenal...." Read more
"...the summer, as well as all the road salt that gets used, I'd say it's held up well. Applying this is an easy afternoon project. I had no problems...." Read more
"...The second and third grades of sandpaper really are very smooth and fine, and you can finish-off the third grade of sandpaper with a really light..." Read more
Customers find the instructions for the auto accessory easy to follow and the English is fluent.
"...This isn't hard work by any definition.The steps are pretty straight forward and simple...." Read more
"...perfect, fluent English; it was not overly verbose so the directions were easy to follow; and it was three simple steps on three small pages so it..." Read more
"...Not only is it incredibly easy to use, but the results are simply phenomenal...." Read more
"...Applying this is an easy afternoon project. I had no problems...." Read more
Customers are satisfied with the appearance of the auto accessory. They mention that it makes their headlights look as good as new, and almost like a new car. Some say that the lenses on a 2012 civic look new, clean, and clear in color. Overall, most are happy with the product's performance and recommend it to others.
"...After they dried for several hours, they still looked amazing...." Read more
"...clear lenses that drastically improve visibility and the overall appearance of your vehicle...." Read more
"...After the application, it was immediately obvious that it came out looking great...." Read more
"...and they're completely dry to the touch, and very smooth and glossy.This is a terrific product!..." Read more
Customers are satisfied with the value of the auto accessory. They mention that it's well worth the effort and cost, providing a very good result for the price. Some say that it saves them considerable money.
"...It is *so* worth the purchase. I’d highly recommend it, and whenever it wears off, I will certainly be purchasing another kit and doing this again." Read more
"...It's a cost-effective solution that delivers perfect results right at home...." Read more
"...This is much easier and cheaper." Read more
"...This worked great, hopefully it lasts more than a year, but the kit is affordable and easy if I need to do it again...." Read more
Customers are satisfied with the clarity of the auto accessory. They mention that it makes the lens very clear, and the vision at night is amazing. Some say that it does a great job of restoring clarity and shine to yellowed lenses. Overall, most are happy with the product's clarity and durability.
"...They were crystal clear. After they dried for several hours, they still looked amazing...." Read more
"...step is essential because the lights dramatically shine and are exceptionally clear after applying this clear coat.)-..." Read more
"...steps, you transform your foggy, yellowed headlights into crystal-clear lenses that drastically improve visibility and the overall appearance of..." Read more
"...These turned out great, very clear and the beam at night is really good...." Read more
Customers like the cleaning of the auto accessory. For example, they say it clears up foggy lenses, eliminates any sanding fog, and creates a shiny finish. Some mention that the product works well and keeps their work area cleaner.
"...But in addition to that, it provides lightly abrasive sandpaper, a stain remover, and a clear coat...." Read more
"...It even removed some light rock pitting!..." Read more
"...The final UV coating fills the tiny scratches and the surface becomes glassy and stays that way for almost a year, then slowly degrades...." Read more
"...Also, in step three, the clear coat solution is messy and sticky, so use the glove, and make sure you use plenty of that stuff to avoid any gaps,..." Read more
Customers are mixed about the brightness of the auto accessory. Some mention that the headlights are much brighter afterwards, with the light output having probably doubled. They say the lights shine vibrant again, allowing more light to project onto the road. However, others say that the lighting is really poor, with rough surfaces and the head light no longer shines through clearly.
"...(this step is essential because the lights dramatically shine and are exceptionally clear after applying this clear..." Read more
"...Even better I've gained over double the visibility at night, which was a huge safety concern before!..." Read more
"...I was disappointed after sanding because the lights still looked oldish and I couldn't imagine that the clear coat would be the difference...." Read more
"...These turned out great, very clear and the beam at night is really good...." Read more
Customers are dissatisfied with the fogginess of the auto accessory. They mention that the headlights remained hazy until the final UV coating was applied. Some say that the compound was used poorly and the headlamps were incredibly cloudy.
"...At this point, it looks hazy. The last step is to apply a sealant to the headlight. This step is really wild...." Read more
"...It's starting to haze a bit and has some chips out of it so I'm going to redo it...." Read more
"...in strange splotchy patches of buildup and the driver's side was considerably fogged over...." Read more
"...short term, but if you don't replace the UV coating, the plastic will start to get cloudy and yellow right away again...." Read more
Reviews with images
-
Top reviews
Top reviews from the United States
There was a problem filtering reviews right now. Please try again later.
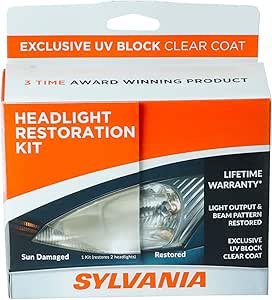
This neat little kit has almost everything you need to get started on your headlights. The missing item is water, which can be free or you can purchase it. It takes very little effort do restore a headlight, and only twice as much for two. At the time, I have lateral epicondylitis which limits my ability to use my arm as well as I would like. Even so, it was no problem. This isn't hard work by any definition.
The steps are pretty straight forward and simple. If you can apply wax to a car, you can do this. The chemical activator sprays on and then rinses off. After this, you do some very light sanding and then apply a polish/buffing substance before spraying it again and rinsing it. At this point, it looks hazy. The last step is to apply a sealant to the headlight. This step is really wild. The haze disappears and you're left with a clear lens that only needs to dry. Basically, if you can spray a pump aerosol bottle, apply and remove car wax, and then wipe the sealant/protector on with a soaked cloth (provided), you're good.
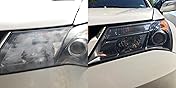
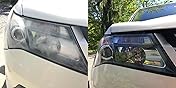
The result? Wow. I started with two 10 year old headlight lenses that were horrible. I didn't think they would pass inspection and they ruined the look of the vehicle. They actually looked better, halfway through, with the lens sanded and hazy. When I completed the last step, wiping on the sealant that has to dry for four (4) hours, I was amazed. They actually looked like I had spent $200 for a new pair of headlight lenses. They were crystal clear. After they dried for several hours, they still looked amazing. The only difference, and it was 100% my fault, is that there were very, very fine scratches on the lens that I didn't get out in the later sanding stages. Now, mind you, you can only see them if you hold the lens a certain way and the light reflects off it. If I had been able to take more time and sand better, they wouldn't be seen on inspection. As with anything, the more time and effort you put into it, the better it looks. As it is, comparing my vehicle to a new one, you can't tell these lenses are even a year old. They really do look brand new.
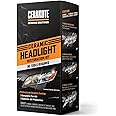
There are other kits on the market and you can do this at home with spray Clear Coat. Honestly, they have got to be harder to do. The Clear Coat spray is going to be harder than just wiping on this sealant because you have to apply the spray two or more times. This kit uses a cream that you just apply heavily and let dry. And, where I am, the spray Clear Coat costs almost as much as this neat little kit does. If you add in the cost of a rubber glove, sand paper in different grits, and the towels, you'll have more money than this kit costs, and without the warranty that you can register for at the Sylvania site. Honestly, I think this is a little much. At this point, I'm more than happy with the results even if they don't last all that long.
How long did this take? All in all, 12 hours. Now, before you go into shock, that was removing the headlights from the vehicle, cleaning them up, starting with the kit, allowing them to cure overnight (indoors and out of any contact with moisture), and then reinstalling them in the vehicle. Since I had to replace the headlight bulbs too, it was just easier for me to remove the assembly. It also turned out to be a plus since you need to let them dry and cure somewhere away from rain and dew. Since it's September, dew sets after dark and this could have messed it up. Just doing the headlights with the kit only took about two hours, stopping to rest my arm and let it dry off some before starting the next step. If I had worked hard, or used a power tool, I could possibly have done both in an hour and been ready for them to cure.
One kit easily did a set of headlights with a little to spare. I have more than enough of the activator and sealant to spare, but only a little of the compound left. Maybe enough for one more headlight.
If you do this with the headlights in your vehicle, you will want to protect the area around them with tape or something to keep the spray and sealant off it.
This kit saved me over $300 for the parts and only took a little time that I had to kill. If you do this in one hour, it's saving you a good bit given the cost of replacing the parts and having to do it (or pay to have it done). If I need to do my other vehicles, I'm getting more of these kits and not stressing over it.
I read positive reviews on Amazon and looked at the customer’s images before I purchased the kit, but I’m always still slightly skeptical until I see it for myself, or personally know someone who has tried a product from online. But after seeing it for myself, I am now a believer!
I buffed the outside of my headlights. You do not buff the inside, if anyone is curious. I can’t imagine buffing the outside would help if you had condensation build-up on the inside (although I’m sure you could apply to the inside of a clear lense?...just make sure you’re not buffing the tint or colored screen of a light. However, I’m sure the product wouldn’t advertise/recommend using on the interior of the lense due to possible damage it could cause). Most cloudy headlights seem to have sun/weather damage, though. This product will most certainly work great on that kind of wear and tear!
For anyone saying toothpaste does the same thing, that is not correct. I’ve tried toothpaste. It helps but it doesn’t deliver the same results as this. This product has a pumice similar to the texture of toothpaste (but thicker and slightly grittier). But in addition to that, it provides lightly abrasive sandpaper, a stain remover, and a clear coat. So overall, it’s much more adept to ensuring as clean of a result as possible. It puts the toothpaste method to shame.
I have not actually tried this product before, so I honestly have no idea how the durability/lifespan will be. However, if I’m going off how well this product worked, I would hope it holds up for a decent amount of time (months) before requiring another attempt. So I rated that aspect 5 stars until something proves otherwise, and I will update if that changes.
The instruction manual was well-written and easy to read, as well as being intuitive and preempting you to get your other supplies ready and pre-reading the instructions before starting the project. It was written in perfect, fluent English; it was not overly verbose so the directions were easy to follow; and it was three simple steps on three small pages so it didn’t take a lot of time to read through the instructions.
Things you will need in addition to the kit:
- Water source (I used a hose, but you could use a large pitcher of water. You just need to be able to keep your sandpaper and lights consistently wet while sanding, and be able to rinse the lenses when the directions call for it).
- Masking tape is optional though I’d recommend it. (The kit says the products will not strip the clear coat or ruin your paint job, but it suggests taping off your lights out of precaution. As long as the paint on someone’s car isn’t stripped of the clear coat or rusting/chipping before taping, then I’d definitely suggest taping off the lights with masking tape.)
- Extra non-latex glove (if you want to wear one on both hands — because the box only includes one glove... I didn’t want anything on my hands, especially the chemicals, so I wore gloves the whole time).
- Have a garbage can, nearby, for waste
- Extra paper towels and/or a shammy for drying (I would have used a car shammy, but I had some soft, blue car-paper towels and those worked well.)
The kit includes:
-A spray that strips stains off the lenses
- 3 soft paper towels that are used for drying, for rubbing pumice, and for applying the clear coat
- 3 different sandpaper strips that you split in half and use one-half on each light (400 grit, 1000 grit, and 2000 grit— you work your way up from coarsest to smoothest grit).
- Gritty pumice to polish the lenses after wet-sanding
- And a UV Protectant Clear Coat to use at the last step (this step is essential because the lights dramatically shine and are exceptionally clear after applying this clear coat.)
- I also kept my phone nearby so I could time my sanding/buffing. It recommends 5 minutes for each step, per light.
Here’s what you need to know:
- This particular kit is only good for 2 lights. My headlights were the main problem, but now that I see how well this works, I’ll probably do this to my taillights as well.
- You need to set aside at least 1 hour for this project. Even 2 hours would be ideal but more than that isn’t needed. And you need to be willing to put some elbow grease into it with all of the sanding. (I’m sure you could use a small sanding buffer too...but people tend to buff too hard with a buffer if they’re not familiar with using one, so I wouldn’t recommend it to everyone. The product does not suggest to use one, but if you’re familiar with a buffer and have one on-hand, I could see how it could expedite the process. Just make sure to keep your headlights and the sandpaper wet while sanding.)
- You are not to touch the headlights for at least one hour after applying the clear coat
- You are advised not to drive the car or leave it in rainy conditions for 4-6 hours after applying the clear coat until the coating cures. (So set aside time to do this when you don’t have to drive somewhere; and make sure to do it on a sunny and/or dry cloudy day, although avoid direct sunlight and freezing cold temperatures).
Seriously though, for $20, it makes it look like you basically have a brand new pair of lights! It is *so* worth the purchase. I’d highly recommend it, and whenever it wears off, I will certainly be purchasing another kit and doing this again.
Reviewed in the United States on May 2, 2019
I read positive reviews on Amazon and looked at the customer’s images before I purchased the kit, but I’m always still slightly skeptical until I see it for myself, or personally know someone who has tried a product from online. But after seeing it for myself, I am now a believer!
I buffed the outside of my headlights. You do not buff the inside, if anyone is curious. I can’t imagine buffing the outside would help if you had condensation build-up on the inside (although I’m sure you could apply to the inside of a clear lense?...just make sure you’re not buffing the tint or colored screen of a light. However, I’m sure the product wouldn’t advertise/recommend using on the interior of the lense due to possible damage it could cause). Most cloudy headlights seem to have sun/weather damage, though. This product will most certainly work great on that kind of wear and tear!
For anyone saying toothpaste does the same thing, that is not correct. I’ve tried toothpaste. It helps but it doesn’t deliver the same results as this. This product has a pumice similar to the texture of toothpaste (but thicker and slightly grittier). But in addition to that, it provides lightly abrasive sandpaper, a stain remover, and a clear coat. So overall, it’s much more adept to ensuring as clean of a result as possible. It puts the toothpaste method to shame.
I have not actually tried this product before, so I honestly have no idea how the durability/lifespan will be. However, if I’m going off how well this product worked, I would hope it holds up for a decent amount of time (months) before requiring another attempt. So I rated that aspect 5 stars until something proves otherwise, and I will update if that changes.
The instruction manual was well-written and easy to read, as well as being intuitive and preempting you to get your other supplies ready and pre-reading the instructions before starting the project. It was written in perfect, fluent English; it was not overly verbose so the directions were easy to follow; and it was three simple steps on three small pages so it didn’t take a lot of time to read through the instructions.
Things you will need in addition to the kit:
- Water source (I used a hose, but you could use a large pitcher of water. You just need to be able to keep your sandpaper and lights consistently wet while sanding, and be able to rinse the lenses when the directions call for it).
- Masking tape is optional though I’d recommend it. (The kit says the products will not strip the clear coat or ruin your paint job, but it suggests taping off your lights out of precaution. As long as the paint on someone’s car isn’t stripped of the clear coat or rusting/chipping before taping, then I’d definitely suggest taping off the lights with masking tape.)
- Extra non-latex glove (if you want to wear one on both hands — because the box only includes one glove... I didn’t want anything on my hands, especially the chemicals, so I wore gloves the whole time).
- Have a garbage can, nearby, for waste
- Extra paper towels and/or a shammy for drying (I would have used a car shammy, but I had some soft, blue car-paper towels and those worked well.)
The kit includes:
-A spray that strips stains off the lenses
- 3 soft paper towels that are used for drying, for rubbing pumice, and for applying the clear coat
- 3 different sandpaper strips that you split in half and use one-half on each light (400 grit, 1000 grit, and 2000 grit— you work your way up from coarsest to smoothest grit).
- Gritty pumice to polish the lenses after wet-sanding
- And a UV Protectant Clear Coat to use at the last step (this step is essential because the lights dramatically shine and are exceptionally clear after applying this clear coat.)
- I also kept my phone nearby so I could time my sanding/buffing. It recommends 5 minutes for each step, per light.
Here’s what you need to know:
- This particular kit is only good for 2 lights. My headlights were the main problem, but now that I see how well this works, I’ll probably do this to my taillights as well.
- You need to set aside at least 1 hour for this project. Even 2 hours would be ideal but more than that isn’t needed. And you need to be willing to put some elbow grease into it with all of the sanding. (I’m sure you could use a small sanding buffer too...but people tend to buff too hard with a buffer if they’re not familiar with using one, so I wouldn’t recommend it to everyone. The product does not suggest to use one, but if you’re familiar with a buffer and have one on-hand, I could see how it could expedite the process. Just make sure to keep your headlights and the sandpaper wet while sanding.)
- You are not to touch the headlights for at least one hour after applying the clear coat
- You are advised not to drive the car or leave it in rainy conditions for 4-6 hours after applying the clear coat until the coating cures. (So set aside time to do this when you don’t have to drive somewhere; and make sure to do it on a sunny and/or dry cloudy day, although avoid direct sunlight and freezing cold temperatures).
Seriously though, for $20, it makes it look like you basically have a brand new pair of lights! It is *so* worth the purchase. I’d highly recommend it, and whenever it wears off, I will certainly be purchasing another kit and doing this again.
Top reviews from other countries
Reviewed in Canada on April 15, 2024
Simple application. Although used some sandpaper I had as the provided was small and wore away.
Has held up with the UV coat and not reverted to its previously worn state.
Reviewed in Australia on January 30, 2024
Simple application. Although used some sandpaper I had as the provided was small and wore away.
Has held up with the UV coat and not reverted to its previously worn state.